Knights of X #1 annotations
As always, this post contains spoilers, and page numbers go by the digital edition.
 KNIGHTS OF X #1
“Hated and Feared”
Writer: Tini Howard
Artist: Bob Quinn
Colourist: Erick Arciniega
Letterer: Ariana Maher
KNIGHTS OF X. This is the relaunch of Excalibur vol 4; to all intents and purposes, this issue is Excalibur #27. Naturally, it’s meant to be a jumping on point, and this issue puts a lot of effort into catching new readers up on the plot.
COVER / PAGE 1. The eight core members of Captain Britain’s questing party – running clockwise from the Captain herself, the others are Rictor, Shatterstar, Gambit, Shogo, Prestige, Meggan and Bei. The book in front of Betsy is the one that Roma gives her on pages 12-13.
PAGES 2-3. Furies attack the village of Jackdaw’s Nest.
The narrator is dutifully recapping the plot of Excalibur, where Merlyn had seized control of Otherworld and was trying to root out mutants. Note that while we’re in Otherworld, the narrator now has a different font and mock-parchment captions, distancing the book from the look of other X-titles. Page 20 seems to indicate that the narrator is telling the story set out the X-marked book that Roma gives to Betsy later on.
Jackdaw’s Nest. We saw this village previously in Excalibur #19, when Betsy and Kwannon passed through it. It seems to be the home town of Jackdaw, the sidekick from early 80s Captain Britain comics, but nothing really turns on that.
Wolverine #20 annotations
As always, this post contains spoilers, and page numbers go by the digital edition.
 WOLVERINE vol 7 #20
“Trigger Warning”
Writer: Benjamin Percy
Artist: Adam Kubert
Colourists: Frank Martin & Dijjo Lima
Letterer: Cory Petit
Editor: Mask Basso
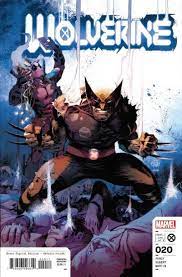
COVER / PAGE 1: Wolverine stands over a bunch of destroyed robots, while Deadpool takes a selfie in the background.
PAGES 2-5. Wolverine stops a runaway truck full of explosives.
This opening action scene is here as much as anything to get Wolverine into the book, while Deadpool sets about his narration. I love the ornate page layouts, which are remarkably clear.
Note that the first of Wolverine’s teams that Deadpool mentions is X-Force, which wouldn’t be most people’s choice. But it’s the one Deadpool is preoccupied with since they were teammates on a version of X-Force before. We’ll come back to that.
Deadpool is sort of correct that Wolverine never really seems to want to be on a team – at the very least he regularly affects not to, and feels ambivalent about his position on a superhero type group. Of course, with the X-Men and Alpha Flight that was balanced out by his sense that they were his family. X-Force raise slightly different issues because they were a black ops group. In the earliest stories about Wolverine’s version of X-Force, from 2008, Wolverine very definitely doesn’t want to be in the team – the idea is that he’s always seen himself as the one who does the nasty things so that his more heroic teammates don’t have to, and so bringing other characters into that orbit is something he’s quite unhappy about.
X-Men #10 annotations
As always, this post contains spoilers, and page numbers go by the digital edition.
 X-MEN vol 6 #10
“Sisterhood of the Metal Bones”
Writer: Gerry Duggan
Artist: Javier Pina
Colourist: Marte Gracia
Letterer: Clayton Cowles
Editor: Jordan White
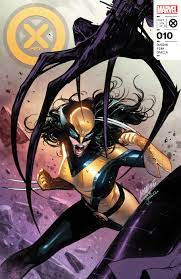
COVER / PAGE 1: Wolverine (Laura) faces off against someone clawed. Anyone who’s been reading the X-books for a while will recognise her as Lady Deathstrike without too much trouble.
PAGE 2. Flashback: Wolverine is resurrected.
This page is plugging what seems likely to be a continuity error in issue #5, where Laura was shown as having a complete metal skeleton (as opposed to just metal claws). In issue #8, she said that this changed “after returning from the Vault”, so this is apparently an expanded version of the resurrection that we saw at the end of X-Men vol 5 #19. If so, Synch and Cyclops should both be here too, but let’s assume they’re out of shot.
The dialogue seems to confirm that Proteus is the member of the Five responsible for resurrecting people complete with their biological implants – which makes sense, since he’s the only one of the group who could logically do that.
X-Force Annual #1 annotations
As always, this post contains spoilers, and page numbers go by the digital edition.
 X-FORCE ANNUAL vol 3 #1
“Lab Work”
Writer: Nadia Shammas
Artist: Rafael Pimentel
Colourist: Carlos Lopez
Letterer: Joe Caramagna
Editor: Mark Basso
X-FORCE ANNUAL. This is the third X-Force Annual #1. The others were in 1992 and 2010. There was also an unnumbered annual in 1999.
This issue seems to take place between X-Force #26-27.
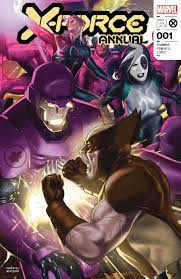
COVER / PAGE 1. Wolverine, Domino and Kid Omega versus Orchis’s Sentinels.
PAGE 2. Sage has doubts about the Beast, and calls Emma Frost.
As we’ll find out later, the Beast has sent the X-Force field team (Wolverine, Domino and Kid Omega) on a mission to retrieve a shipment stolen by Orchis from Hellfire Trading. For reasons which will become apparent as the story goes on, Sage is rightly sceptical about this whole thing, and suspects a trap, but the Beast is insistent. This story doubtless contributes to the breakdown in Sage and Beast’s relationship seen in X-Force #27.
Erta Ale is a volcano in Ethiopia. It’s a rare example of a volcano which actually has a lake of lava; not only that, it’s had one since 1906.
X-Force #27 annotations
As always, this post contains spoilers, and page numbers go by the digital edition.
 X-FORCE vol 6 #26
“From Cradle to Grave”
Writer: Benjamin Percy
Artist: Robert Gill
Colourist: Guru-eFX
Letterer: Joe Caramagna
Editor: Mark Basso
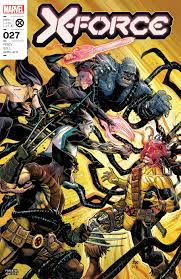
COVER / PAGE 1: X-Force battle the possessed Forge.
PAGES 2-3. Wolverine reflects on recent events.
As the footnote says, Wolverine is referring to the X Lives of Wolverine miniseries, in which Professor X and Jean Grey used Cerebro to transport Wolverine’s consciousness back in time so that he could battle Omega Red at various points in history, and prevent him from altering history by either murdering Professor X or preventing him from being born.
Wolverine claims that “I risked everything for Krakoa. Not just my life, but the timeline.” That’s a bit of a stretch, since Wolverine’s life is at risk in almost every story (to the extent that he’s killable at all), and the whole plot was that if he didn’t go back, the timeline was going to be irreparably altered anyway. Perhaps what he means is that the events of X Lives risked his life in the sense of destabilising his own history, but if so, that’s not something that really came across on the page as being at stake.
Marauders #1 annotations
As always, this post contains spoilers, and page numbers go by the digital edition.
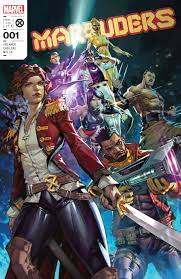 MARAUDERS vol 2 #1
“Extinction Agenda”
Writer: Steve Orlando
Artist: Eleonora Carlini
Colourist: Matt Milla
Letterer: Ariana Maher
Editor: Jordan D White
COVER / PAGE 1: The new Marauders team pose dramatically. For anyone just joining us, this team was assembled in Marauders Annual #1, which is effectively the real first issue of Steve Orlando’s run.
PAGES 2-4. The new Marauders rescue Fever Pitch.
“Gyrich’s little gift”. Henry Peter Gyrich was a senior figure in the anti-mutant organisation Orchis, until Abigail Brand killed him and replaced him in S.W.O.R.D. vol 2 #11.
X-Men Red #1 annotations
As always, this post contains spoilers, and page numbers go by the digital edition.
 X-MEN RED vol 2 #1
Writer: Al Ewing
Artist: Stefano Caselli
Colourist: Federico Blee
Letterer: Ariana Maher
Editor: Jordan D White
X-MEN RED. This is the successor title to S.W.O.R.D., also written by Al Ewing. It’s the second series to go by this name; the first was the series written by Tom Taylor which ran from 2018-19. In that context, the colour was simply indicating another X-Men team to go with Blue and Gold. Here, it refers to the planet Mars, where the series is set.
If you want to be really nitpicky, this is actually X-Men Red vol 1, because the Tom Taylor series was officially called X-Men: Red, but that’s too much even for me.
COVER / PAGE 1. Magneto, Storm and Sunspot on Mars, with the face of Abigail Brand visible behind them.
PAGES 2-5. Flashback: Storm defeats “Nameless” to become ruler of Arakko.
This is an expanded version of a scene previously shown in flashback in S.W.O.R.D. vol 2 #8. All we saw in that issue was the first two panels, though the surrounding dialogue made clear that Storm had issued a challenge to her predecessor as regent and defeated her in combat. That issue also established the basic idea that anyone on Arakko can challenge for a seat on the Great Ring (the ruling council) and win it by defeating the incumbent in combat.
Immortal X-Men #1 annotations
As always, this post contains spoilers, and page numbers go by the digital edition.
 IMMORTAL X-MEN #1
“The Left Hand”
Writer: Kieron Gillen
Artist: Lucas Werneck
Colourist: David Curiel
Letterer: Clayton Cowles
Editor: Jordan D White
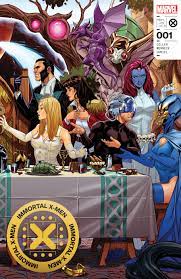
IMMORTAL X-MEN. Despite the name, this is a series about the Quiet Council – and not all of them are exactly X-Men. It’s the first series with this title, not to be confused with just-plain-X-Men, which is about the New York based superhero team.
The series logo – an X with twelve dots around it – represents the twelve members of the Council in their groups of three.
COVER / PAGE 1. It’s the Quiet Council doing Leonardo Da Vinci’s The Last Supper, albeit somewhat compressed to get it onto a double page spread. The original painting, specifically, is meant to show the moment after Jesus has announced that one of his apostles will betray him. It’s probably not desperately important which apostle is represented by which Quiet Council member, particularly as most of the Apostles can only be identified by external sources rather than from the painting itself, but that’s no reason not to tell you anyway, right? More fundamentally, the original painting groups the apostles in threes, which mirrors the division of the Quiet Council – and that’s sort of reflected here. Working roughly from left to right along the table (and going by the rather more spaced out arrangement in the original painting):
- Colossus is Bartholomew.
- Storm is James the Less.
- Nightcrawler is Andrew.
- Mr Sinister is, of course, Judas Iscariot. He’s knocked over his wine glass; in the original painting, Judas has knocked over his salt cellar.
- Exodus is Saint Peter. Befitting his religious bent, he’s the only character to be drawn with a halo.
- Death – who is absolutely not a member of the Quiet Council and whose attitude to this whole “resurrection” thing remains unclear – is in John’s position.
- The empty chair in the centre, with a Phoenix emblem on the back and Magneto’s helmet sitting in front, is where Jesus would be.
- Sebastian Shaw is Thomas, the doubting one.
- Emma Frost is James the Greater.
- Kate Pryde is Philip.
- Professor X is Matthew.
- Mystique is Jude.
- Destiny is Simon.
X Deaths of Wolverine #5 annotations
As always, this post contains spoilers, and page numbers go by the digital edition.
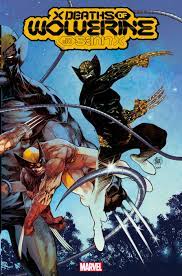 X DEATHS OF WOLVERINE #5
Writer: Benjamin Percy
Artist: Federico Vicentini
Colourist: Dijjo Lima
Letterer: Cory Petit
Editor: Mark Basso
COVER / PAGE 1. Wolverine fights Omega Wolverine. This is the other half of the image from the cover of X Lives of Wolverine #5, with elements of a fight between Wolverine and Omega Red spreading onto the page.
PAGES 2-4. Moira’s life flashes before her eyes as she dies.
She’s inside a sort of Krakoan battle suit thingy that she stole last issue.
Page 2, and the bench panels on page 3, are a parody of the flashback from Powers of X #1 in which Moira approaches Charles Xavier and reveals her previous lives to him.
X Lives of Wolverine #5 annotations
As always, this post contains spoilers, and page numbers go by the digital edition.
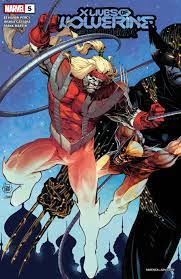 X LIVES OF WOLVERINE #5
Writer: Benjamin Percy
Artist: Joshua Cassara
Colourist: Frank Martin
Letterer: Cory Petit
Editor: Mark Basso
COVER / PAGE 1. Wolverine fights Omega Red, with a Russian skyline and Omega Wolverine in the background. Needless to say, this is a companion to the cover of X Deaths of Wolverine #5, which will have the other half of the image (Wolverine fighting Omega Wolverine, with present-day Wolverine and a Krakoan skyline in the background).
PAGE 2. Omega Red possesses Wolverine and attacks Professor X.
Picking up directly from the end of issue #4. The background is a montage of images of Wolverine (or Logan) at various points in his life, mostly fairly generic. To the extent that they’re recognisable, starting top left on the first full row:
